Section 1
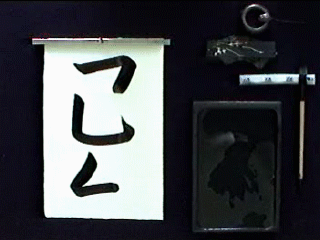
1 Tools
2 Lines
3 永 ei
4 本 hon
5 自 ji
6 由 yuu
Section 2
7 主 shu
8 月 tsuki
9 花 hana
10 岩 iwa
11 友 tomo
12 目 me
Section 3
13 耳 mimi
14 手 te
15 米 kome
16 国 kuni
17 光 hikari
18 空 sora
Section 4
19 見 ken
20 天地 tenchi
21 春風 harukaze
22 克己 kokki
23 洗心 senshin
24 喜 ki
Section 5
25 ア a カ ka
26 サ sa タ ta
27 ナ na ハ ha
28 マ ma ヤ ya
29 ラ ra ワ wa
30 濁点 dakuten
Ritchie & Kathy
Names

Lesson 2 - Lines
In this section we are going to cover lines. There are three types of horizontal lines and three types of vertical lines. We will discuss these in detail and then we will then visit continued lines which combine several lines.
Practice Hints
For practice, print out the samples for reference. Clicking on the images will show enlarged samples suitable for use as a model.
I encourage you to use Japanese paper for your practice, however, this can be quite expensive. As a substitute newspaper can be used, but this is bad for brushes. If you choose to use newspaper, use your least expensive brush.
I suggest you allocate an hour a day at least three days a week for practice. For the first forty-five minutes go over the lesson and pick a particular section to concentrate on. Instead of trying to do every stroke in a practice session, pick a particular stroke and practice until it is just right.
In the last ten minutes put away the practice material and what we are going to do is concentrate on doing one's best work. Prepare your space and materials. In a relaxed and centered mental place prepare your ink. Towards the beginning you might want to visualize what you are going to create and visualize the feel of the brush and the paper as your practice the stokes in your mind. As you get towards finishing the ink your mind should be blank and calm. You know what you have to do and this is the time to just do it.
Continue to practice in this manner. Concentrate on being calm and focused.
The last five minutes of the practice session will be for cleanup and care of the tools. We discussed how each tool should be cared for in the previous lesson and I encourage you to refer to the first lesson until you are confident with their care.
Lesson 2 Vocabulary
| Romaji | Hiragana | Japanese | English |
| chuu | ちゅう | 柱 | Pillar Vertical Line |
| fu | ふ | 俯 | Bowed Horizontal Line |
| gakusei | がくせい | 学生 | Student |
| gyou | ぎょう | 仰 | Slanted Horizontal Line |
| hane | はね | 撥ね | Flick Stroke |
| hei | へい | 平 | Flat Horizontal Line |
| ro | ろ | 露 | Dewdrop Vertical Line |
| sensei | せんせい | 先生 | Teacher |
| shin | しん | 針 | Needle Vertical Line |
| tatega | たてが | 縦画 | Vertical Stroke |
| tensetsu | てんせつ | 転折 | Continued Lines |
| yokoga | よこが | 横画 | Horizontal Line |
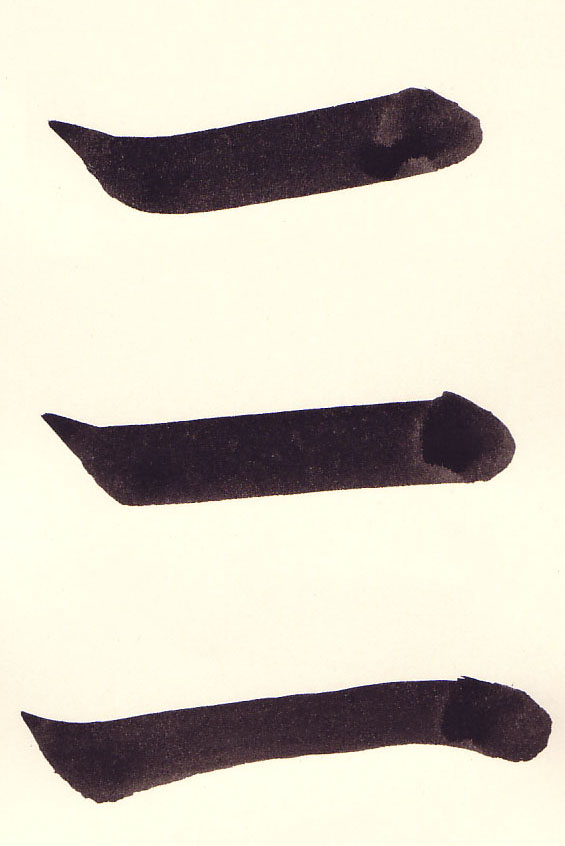
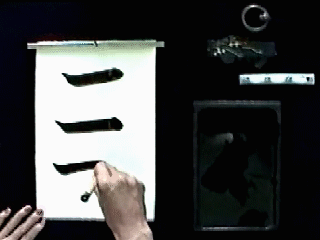
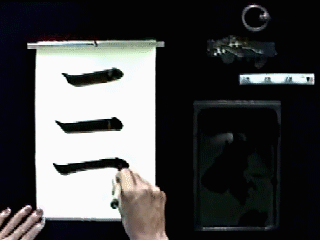
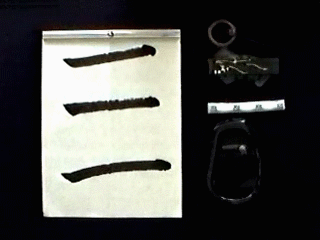
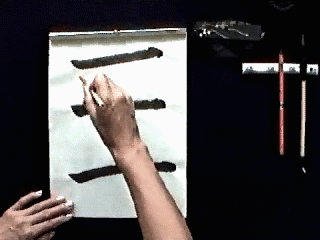
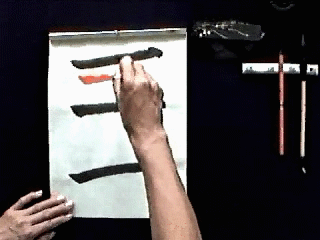
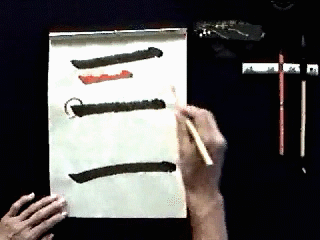
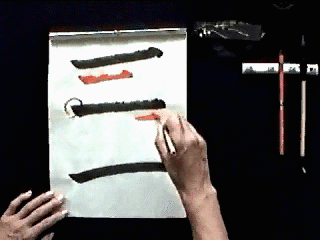
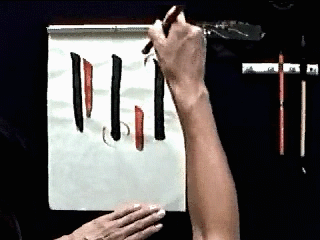
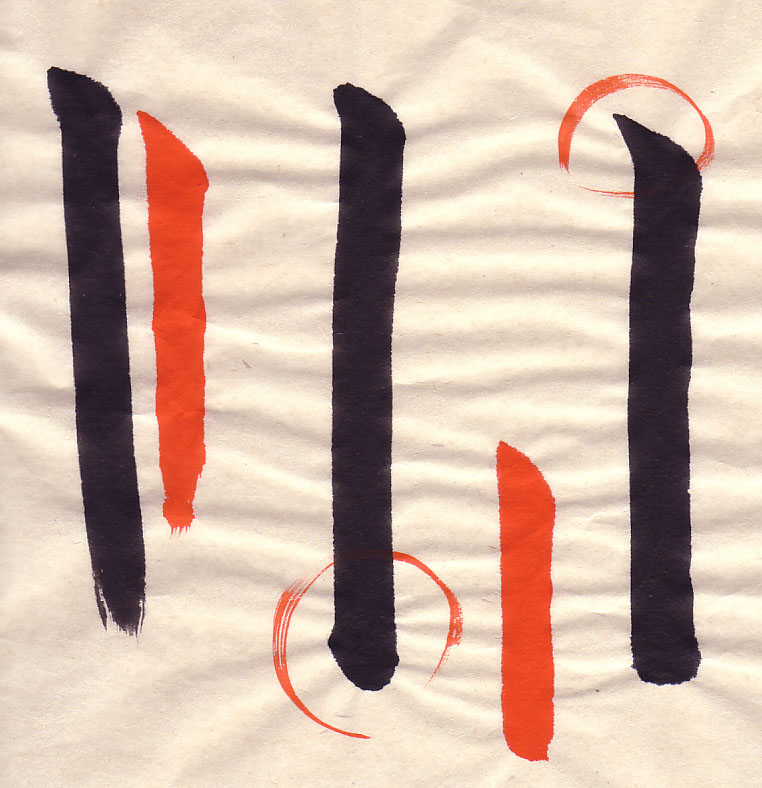
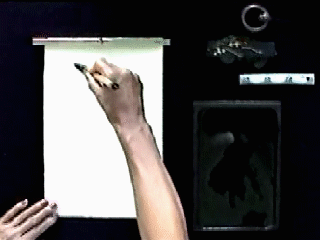
Yokoga (Horizontal Lines) 横画
|
Three Basic Horizontal Lines |
|||
| Location | Romaji | Kanji | English |
| Top | gyou | 仰 | Slant |
| Middle | hei | 平 | Flat |
| Bottom | fu | 俯 | Bow |
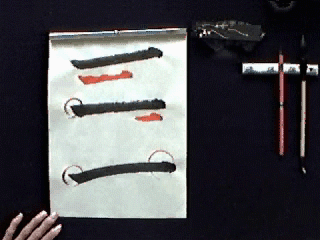
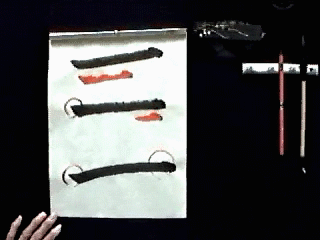
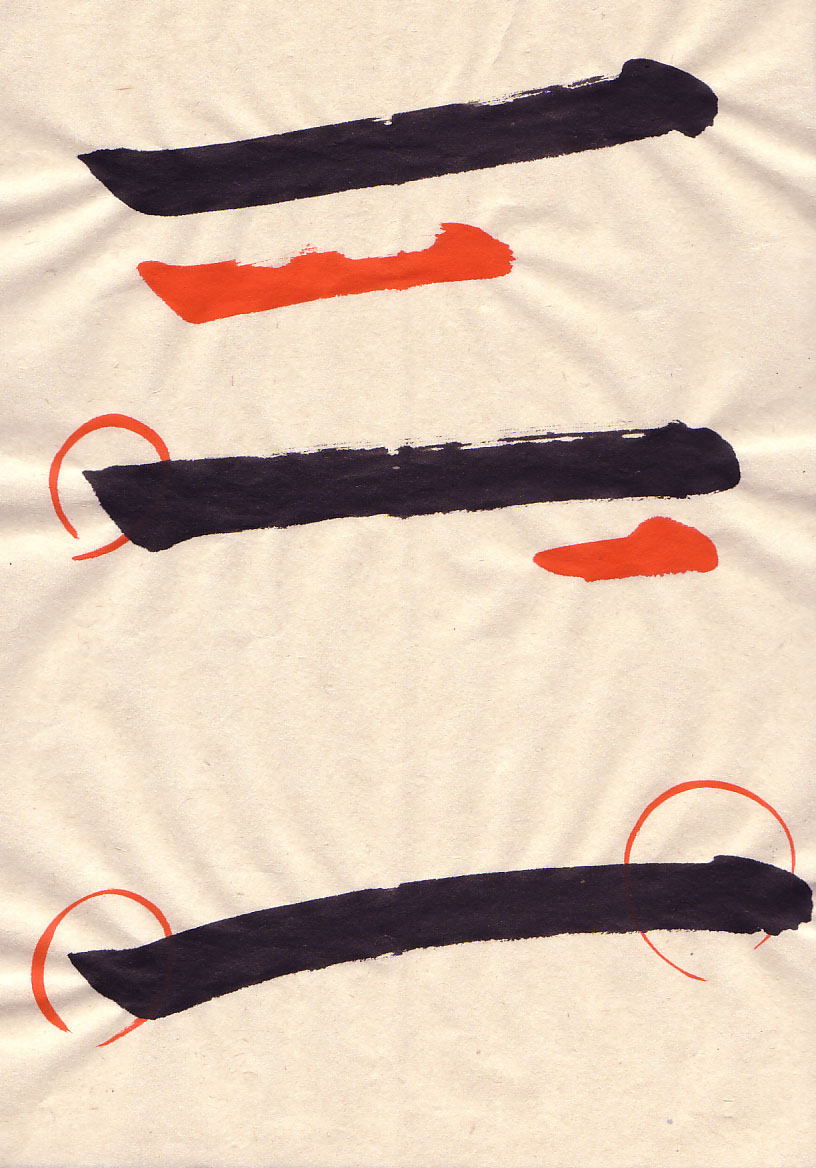
| Yokoga (Horizontal Lines) 横画 Samples | |
 |
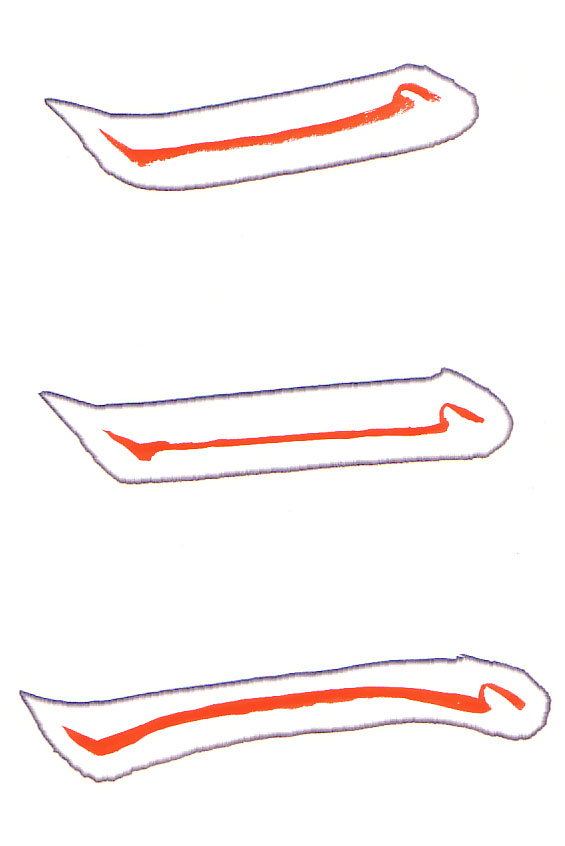 |
| Yokoga (Horizontal Lines) 横画 | Yokoga (Horizontal Lines) 横画 Annotated |
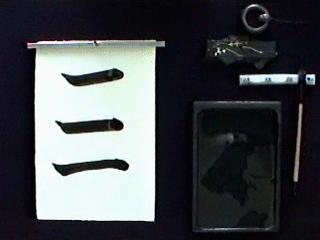
Yokoga (Horizontal Lines) 横画 Sensei Video
Why is the brush applied to the paper at a 45 degree angle?
Over and over again we emphasize applying the brush to the paper at a 45 degree angle. The reason being that we want to keep a nice point on the brush throughout the stroke. If the brush is brought straight down or at a steep angle onto the paper then the bristles will split apart and bow outwards. If the brush is applied at a 45 degree angle then the brush maintains its shape throughout the stroke.
When the brush is applied at a 45 degree angle, the brush will naturally curve and if handled correctly will maintain its shape throughout the stroke. One will need to rotate and tilt the brush so that the thick part of the curve is facing the direction of the stroke. One can see this rotation in the hand position in the gyou stroke that follows.
|
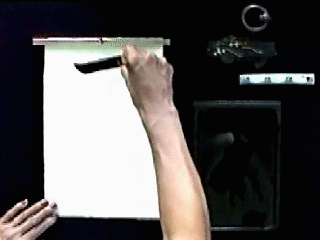
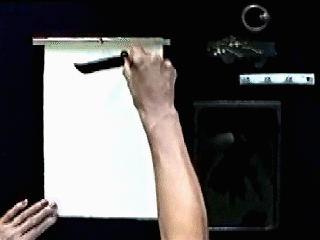
Yokoga (Horizontal Lines) 横画 Sensei Video - Frame by Frame Analysis |
|
|
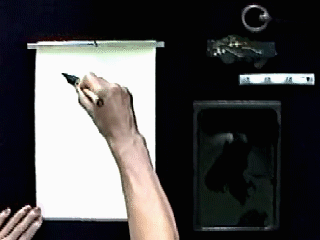
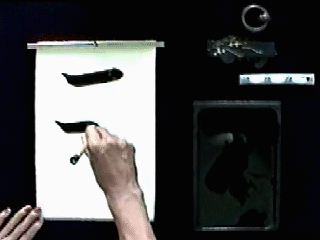
1. Gyou Each of the lines will start out with the brush touching the paper at a 45 degree angle. As the brush is applied in this manner a crisp entry to the line is created. |
2. The gyou line tilts upward slightly. Using even pressure on the brush is critical to give the line a consistent width. |
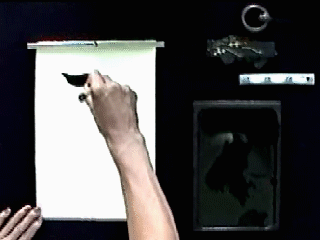
|
3. Notice at the end of the line there is a little bulge. To create this one cannot simply rotate the brush on the paper as it will not look good. Rather lift the brush up (but not off) the paper, rotate the brush forty-five degrees clockwise, and then reapply pressure. Then life the brush up and off the paper. This will give a nice ending to the line. |
4. The feature of the gyou line is the slight upward slant. |
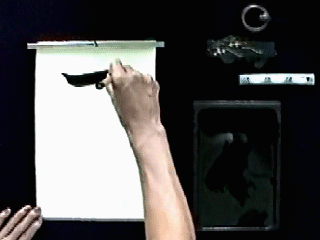
|
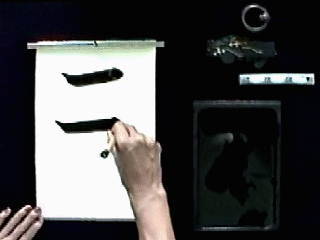
5. Hei Again the line is started by applying the brush to the paper at a 45 degree angle. Press down slightly and then release. Then rotate the brush counterclockwise so the thick part of the brush is facing to the right. |
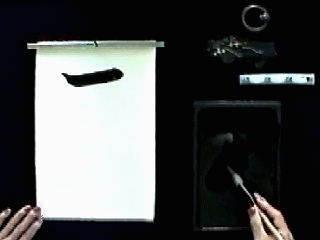
6. Bring the brush straight across the paper keeping consistent downward pressure on the brush to ensure that the line width is the same for the entire line. |
|
7. To end the line, release pressure and lift the brush up (but not off) the paper, rotate the brush forty-five degrees clockwise, and then reapply pressure. Then life the brush up and off the paper. This will give a nice ending to the line. |
8. The feature of the hei line is the straightness and the even width of the entire line. |
|
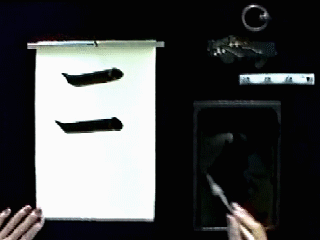
9. Fu Again the brush is applied in the same manner for each line. |
10. The fu line is convex in that it bows slightly upward. When drawing the line, the pressure on the brush is released slightly as one moves towards the middle of the line and reapplied as one moves away from the middle. This gives the line a varied thickness. |
|
11. To end the line, release pressure and lift the brush up (but not off) the paper, rotate the forty-five twenty degrees clockwise, and then reapply pressure. Then life the brush up and off the paper. This will give a nice ending to the line. |
12. The main feature of the fu line is its convex shape with gradually decreasing and then again increasing line width. |

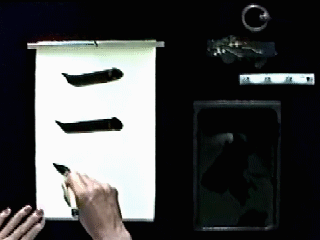
Each of the above lines begin and end almost exactly the same. The main difference between the three lines is the direction of the line and the pressure on the brush as the line is being drawn.
The difference in the ending comes because of the direction the brush is
moving before the ending of the line started by the upward (towards the top
of the paper) movement of the brush.
|
Yokoga (Horizontal Lines) 横画 Student 1 Video |
|
 |
 |
|
Yokoga (Horizontal Lines) 横画 Student 1 Video - Frame by Frame Analysis |
|
|
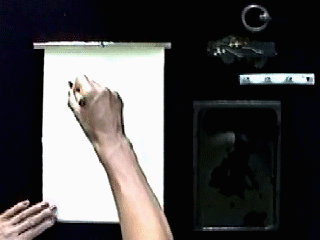
1. The student applied the brush at a 45 degree angle, but did not pause the brush for a split second to give a nice crisp start. |
2. Notice the difference the slight pause makes. This gives the beginning of the line sharp definition. |
|
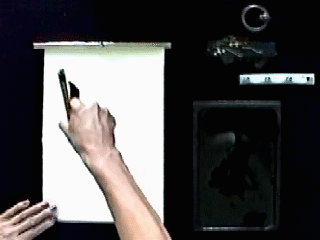
3. This is better. |
4. The student just stopped the line at the end. Here what should be done is to stop the brush, raise it slight up (towards the top of the paper) while relaxing the pressure on the brush. The angle of the brush is then changed to a 45 degree angle and reapplied. This gives a very nice ending to the line. |
|
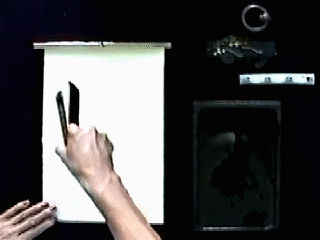
5. There should be a "mountain" at the end of the stroke. This is done by bringing the brush up slightly. |
6. Then down a bit |
|
7. And back. |
8. The start of the fu line is fine. |
|
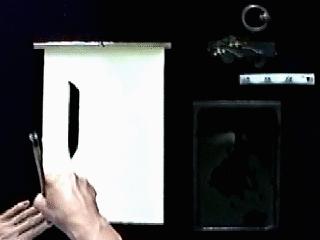
9. Better. |
10. Overall the lines are too thin for the length. However, at this point we should not be over critical. There are many things that we need to get right and concentrating on the strokes and what needs to happen when is good enough. |

Yokoga (Horizontal Lines) 横画 Student 1 Critique Close-up
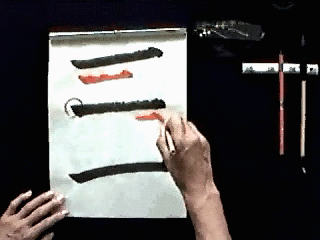
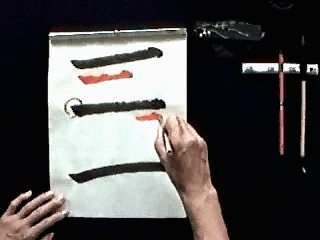
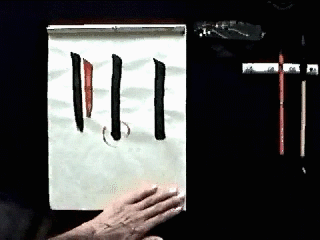
Tatega (Vertical Lines) 縦画
There are three basic vertical lines:
|
Vertical Lines |
|||
| Location | Romaji | Kanji | English |
| Left | shin | 針 | Needle |
| Middle | chuu | 柱 | Pillar |
| Right | ro | 露 | Dewdrop |
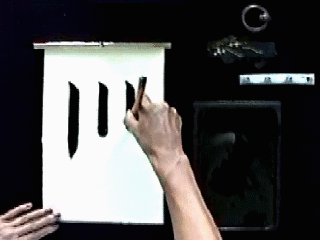
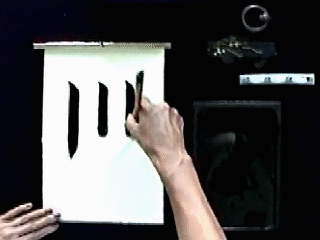
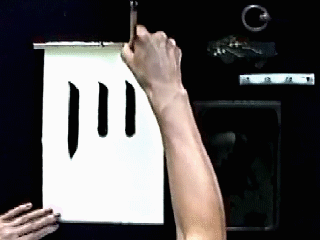
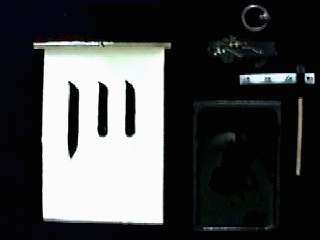
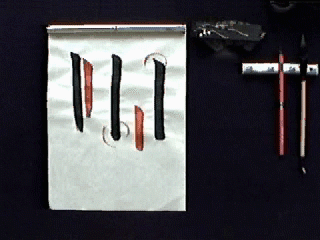
| Tatega (Vertical Lines) 縦画 Samples | |
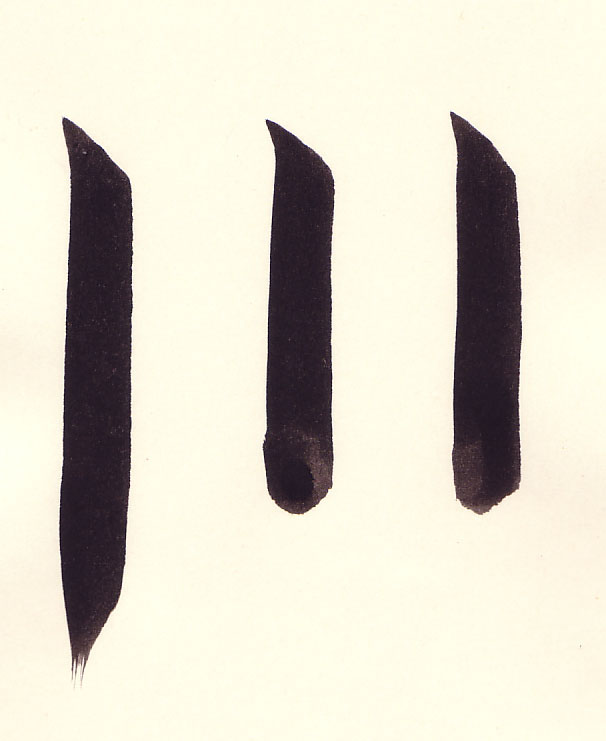 |
 |
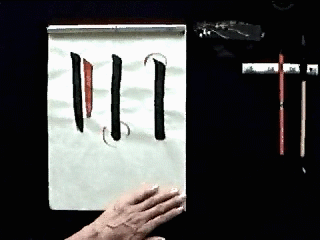
| Tatega (Vertical Lines) 縦画 | Tatega (Vertical Lines) 縦画 Annotated |
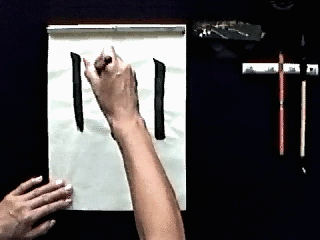
Tatega (Vertical Lines) 縦画 Sensei Video
|
Tatega (Vertical Lines) 縦画 Sensei Video - Frame by Frame Analysis |
|
|
1. Shin (針) Needle Apply the brush to the paper at a 45 degree angle. Press down gently on the brush and come back up a little. Then rotate the brush clockwise so the thick part of the brush is towards the bottom of the page. The brush is also tilted so the tip of the brush is well below (towards the bottom of the page) of the end of the brush. Then push the brush straight down using your arm to draw the line. This will be the same for each of the vertical lines. |
2. Keep an even pressure on the brush and use your arm to draw the line. |
|
3. Shin means needle and this describes the end of the line which comes to a point. This is done by lifting the brush off the paper on the down stroke. |
4. As always notice the large (almost exaggerated movement of the brush) on the finishing stroke. From the video notice that this is not like a conductor with a baton twirling. Rather these are large deliberate and controlled movements. |
|
5.Chuu (柱) Pillar Start the brush at a 45 degree angle. |
6. Note the change in the hand position. The brush has been rotated slightly in a clockwise manner to bring the thick part of the brush facing the bottom of the page. |
|
7. To end the stroke, pressure on the brush is released a bit, the brush tip is moved up and to the left then as pressure is reapplied while brush bringing the brush downward. |
8. Ro (露) Dewdrop Start the line by applying the brush to the paper at a 45 degree angle. Press down gently on the brush and come back up a little. |
|
9. The brush is then rotated clockwise so the thick part of the curve of the brush is facing downward. The brush is also tilted so the tip of the brush is well below (towards the bottom of the page) of the end of the brush. Then draw the line towards you using your arm to draw the line. |
10. To end the stroke, the brush is lifted a bit and reapplied very briefly. |
|
11. Finally the brush is lifted in an upward stroke (towards the top of the paper) and off of the paper. This is performed in a large motion. This motion gives the end of the stroke a dewdrop like appearance. |
12. Note again that the lines all begin in the same way and then main difference between them is how the strokes are ended. |
|
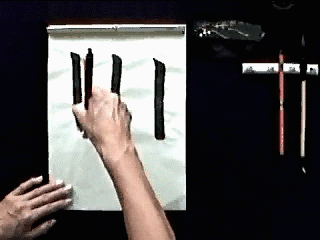
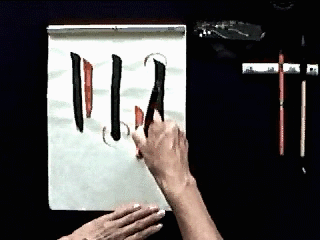
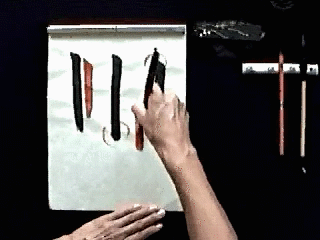
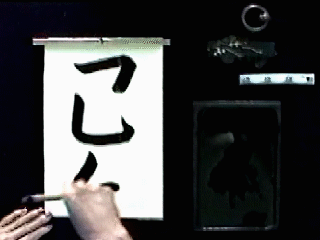
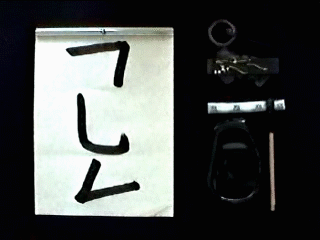
Tatega (Vertical Lines) 縦画 Student 1 Video |
|
 |
 |
|
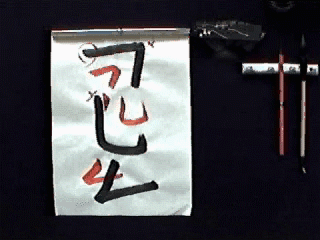
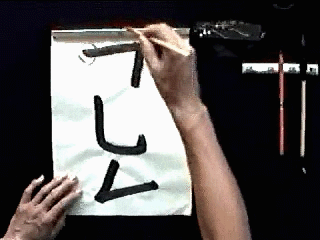
Tatega (Vertical Lines) 縦画 Student 1 Video - Frame by Frame Analysis |
|
|
1. Here the student used the wrist to draw the line with a counterclockwise rotation. |
2. One should use the arm and push the brush straight down (towards the bottom of the paper). |
|
3. The shin line should be straight. |
4. The ending of the chuu line is fine. |
|
5. In the ro stroke, the student lifted the brush directly off of the paper. |
6. The correct motion is to pause slightly at the end of the stroke. |
|
7. And then reversing the direction of the stroke bring the brush up (towards the top of the paper). |
8. As the brush is brought up it is also lifted off the paper. The almost exaggerated stroke is important. |
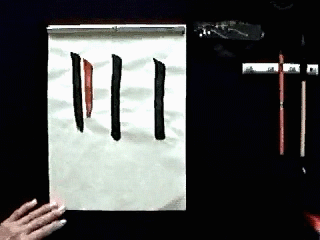
Tatega (Vertical Lines) 縦画 Student 1 Critique Close-up
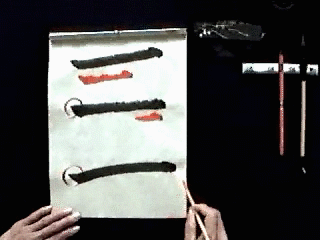
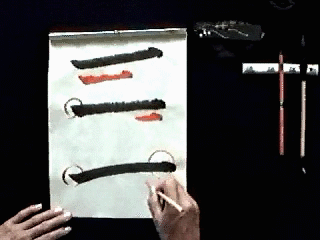
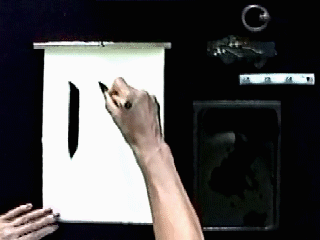
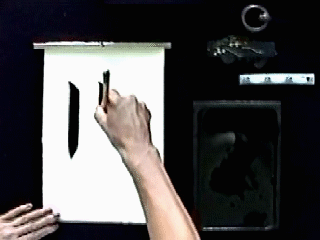
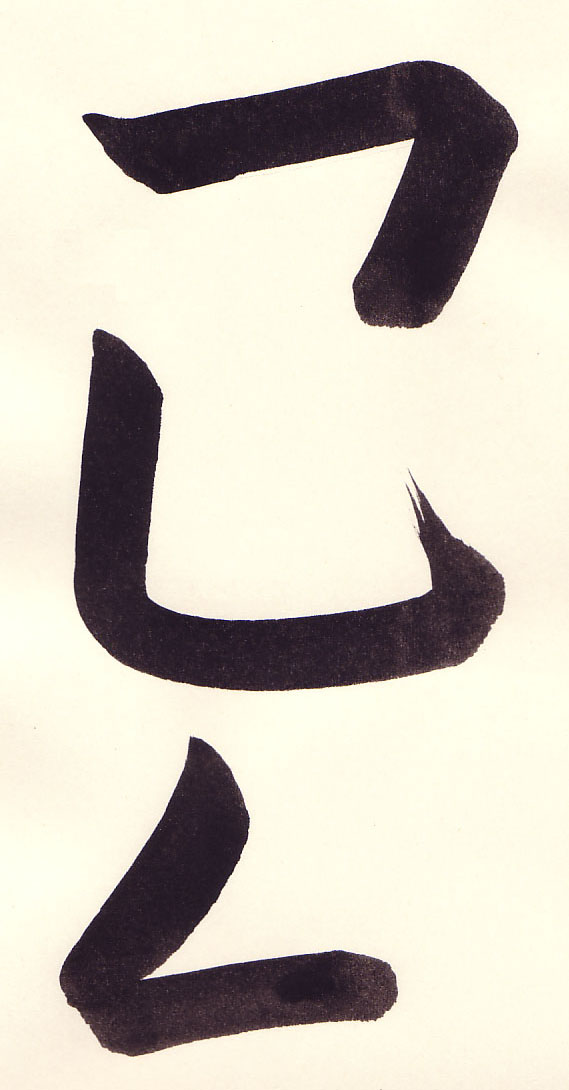
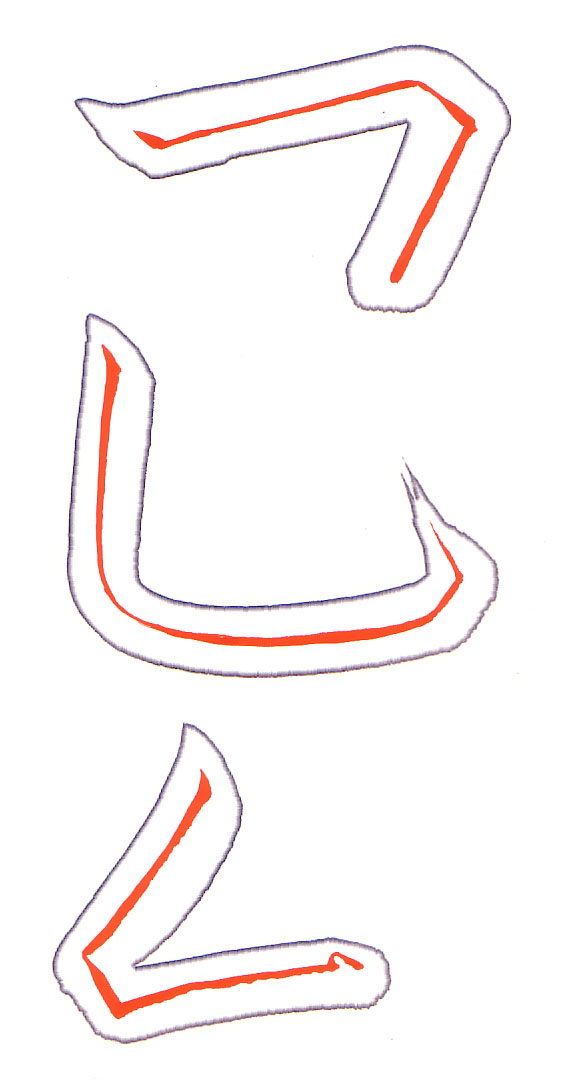
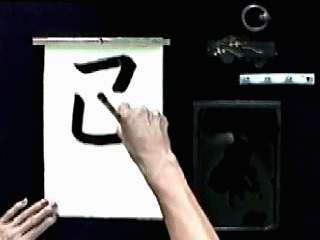
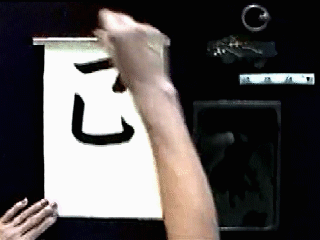
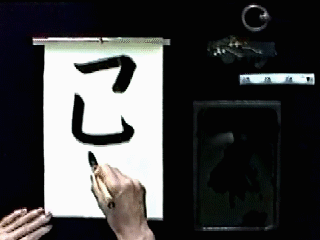
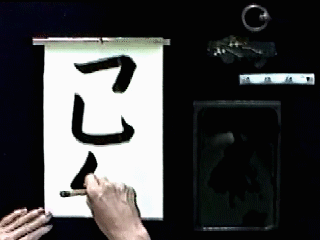
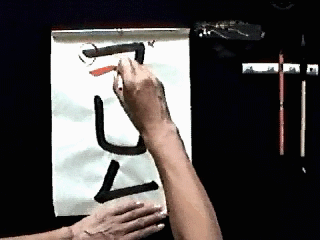
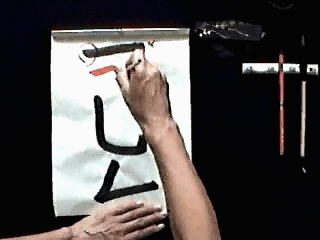
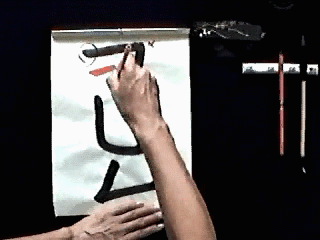
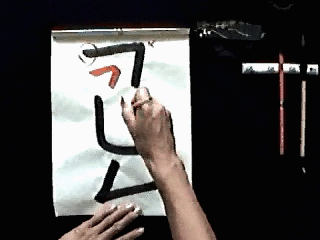
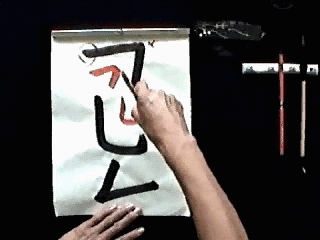
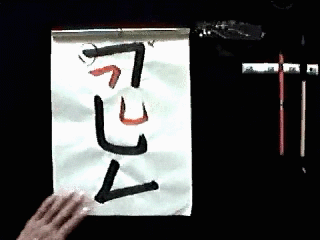
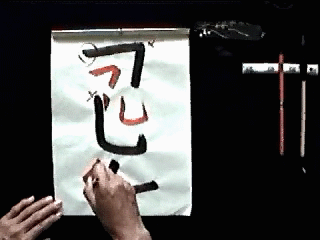
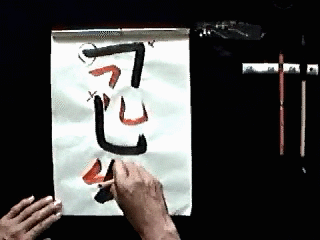
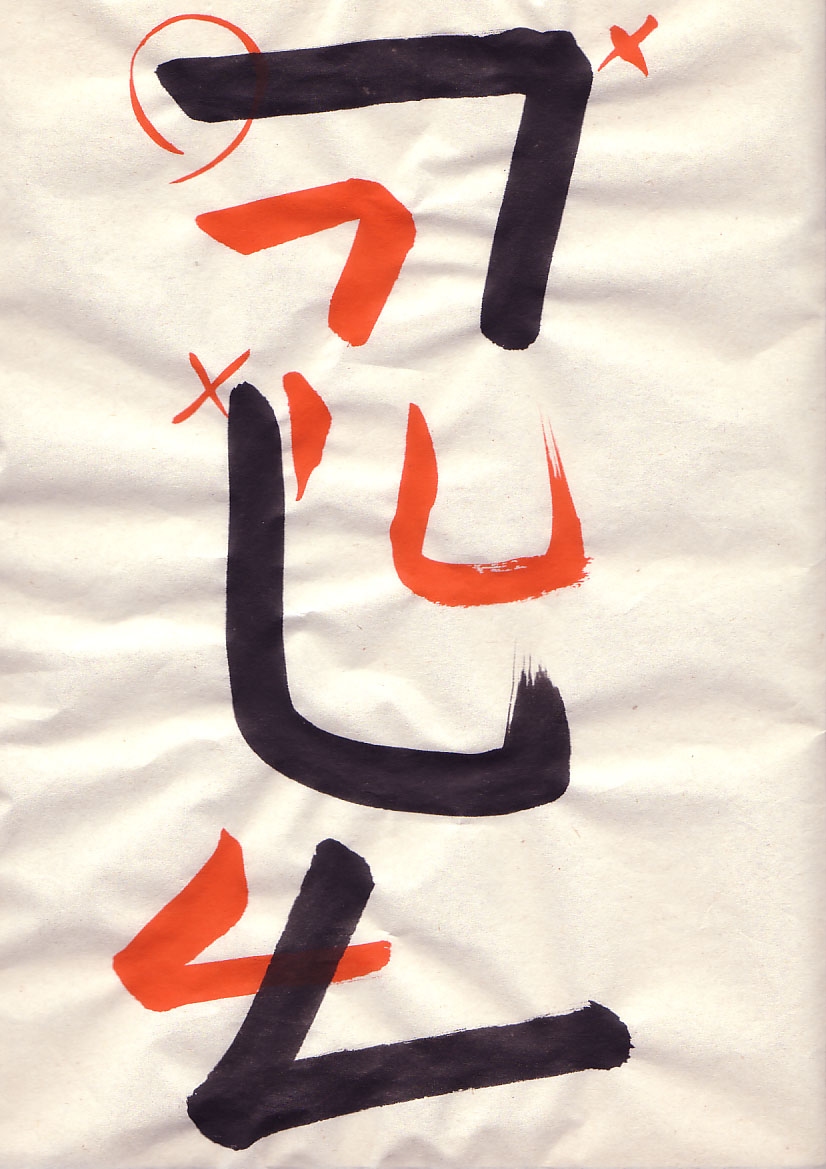
Tensetsu (Continued Lines) 転折
Here we introduce three continued lines called tensetsu (転折):
| Tensetsu (Continued Lines) 転折 Samples | |
 |
 |
Tensetsu (Continued Lines) 転折 Sensei Video
|
Tensetsu (Continued Lines) 転折 Sensei Video - Frame by Frame Analysis |
|
|
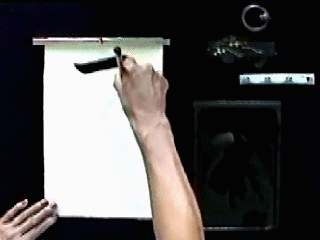
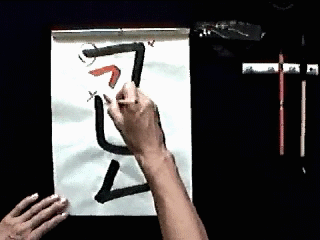
1. Begin this tensetsu by applying the brush to the paper at a 45 degree angle. |
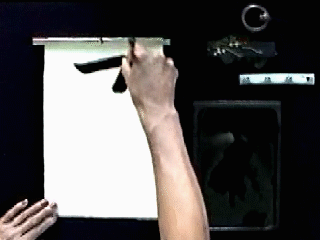
2. In order to get the nice 45 degree angle on the right, pause a bit to reposition the brush by rotating it clockwise 45 degrees. Now the thick curve of the brush is down and to the right. Draw a short line. |
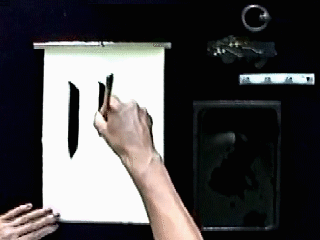
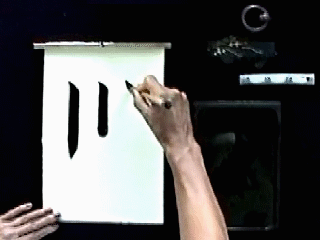
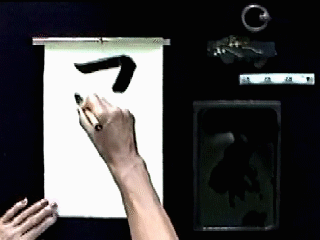
|
3. Again pause to reposition the brush a bit clockwise so the thick part of the brush is down and to the left. Note how the hand position is changed to bring the thick end of the brush in line with the direction of the line being drawn. Use your entire arm to draw this vertical component that is angled slightly to the left. |
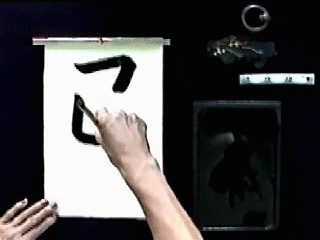
4. At the end of the line there is no pause. |
|
5. The brush is brought up (towards the top of the paper) and off the paper. |
6. Begin the stroke by applying the brush at a 45 degree angle. |
|
7. This stroke starts normally with applying the brush at a 45 degree angle. There is a slight pause as the brush is rotated to bring the thick end of the brush in the direction of the motion of the stroke. The movement of the main part of the stroke is one consistent motion. |
8. At the end of the stroke draw a 45 degree angle line. This is slight, but important. At the top of the line add a hane stroke (we will talk more about this in the next lesson) which is almost a flicking of the brush but in an exaggerated manner. |
|
9. The hane stroke is a large motion and quick stroke. |
10. This stroke is also started by applying the brush at a 45 degree angle. |
|
11. Here the slight 45 degree angle line is being drawn. |
12. And the brush is rotated to do the horizontal component of the line. |
|
13. The important point of this stroke is to get a nice edge the brush is drawn at a 45 degree angle before continuing with the horizontal stroke. |
14. The hand is brought back to the left to give a precise and non-thickened end to the line. |


|
Tensetsu (Continued Lines) 転折 Student 1 Video |
|
 |
 |
|
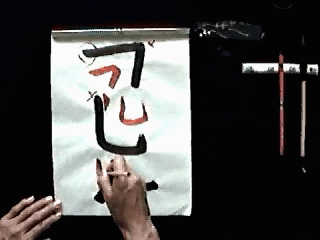
Tensetsu (Continued Lines) 転折 Student 1 Video - Frame by Frame Analysis |
|
|
1. The student started the stroke at a 45 degree angle. This is good. |
2. When creating the angle, the student simply dropped the line straight down. There are actually three lines in this stroke: the horizontal, the slight 45 degree line and the vertical line. |
|
3. Here the slight 45 degree line is being drawn. |
4. And now the brush and hand position is changed to draw the vertical line. |
|
5. Note in the first line the nice 45 degree angle corner in red and the 90 angle corner of the student sample. There should be this nice crisp 45 degree angle in the corner. For the second line, as with almost all lines, apply the brush to the paper at a 45 degree angle. |
6. The student went directly into the hane stroke (a large almost flicking action) from the horizontal component. The end of this line has a slight 45 degree line before beginning the hane stroke. We will discuss the hane stroke in detail in the next lesson. |
|
7. The curve of the second line is a high. The brush is brought down (towards the bottom of the page) and then rotated counterclockwise a bit to begin the horizontal component. |
8. The start of the second line also does not have the nice 45 degree angle. |
|
9. Apply the brush at a 45 degree angle. |
10. Rotate the brush so the thick part of the brush is in the direction of the line. And applying even pressure on the brush pull the brush to the lower left. |
|
11. At the bottom of the line, the student brought the brush directly to the right to start the horizontal component. Instead a slight 45 degree line is drawn that gives a crisp edge to the corner. From this 45 degree line the horizontal component is then drawn. |
12. Note the angle of the hand and how the brush has been rotated to get the thick part of the curve against the paper and also how the brush is pushed to the left at a slight upward angle. |

Tensetsu (Continued Lines) 転折 Student 1 Critique Close-up
We have covered a lot in these two lessons. The important point is to get used to the tools that you have and to practice, practice, practice.
There is so much more to cover and things get even more interesting in the next lesson where we cover the symbol for Eternity which has the eight basic stroke required for the kaisho font. By mastering these eight strokes one will be able to write many different characters.
Also, don't be too concerned if the lines are not perfect. The objective is to increasingly get better. You will notice that while some of the student samples are not perfect, I do mark as acceptable parts that can still be improved upon. If the student is applying the brush at a 45 degree angle at this point and the entry looks basically correct, then this excellent progress.
And don't be hesitant to return to lessons two and three for further review. Each point should become second nature and it is important to review to make sure you have not picked up a bad habit along the way.
Copyright © 2017 Takase Studios, LLC. All Rights Reserved.